What Every Production Manager Should Know About UV Intensity
In the high-stakes world of industrial manufacturing, precision is the difference between a profitable run and a warehouse full of scrap. For production managers overseeing UV curing processes—whether in printing, electronics, automotive coating, or medical device assembly—understanding UV intensity is not just a technical requirement; it is a fundamental pillar of quality control and operational efficiency.
UV curing is often treated as a “black box” technology: if the light is on and the product looks dry, everything must be fine. However, this lack of visibility into the actual UV output is a leading cause of product failure, downtime, and wasted energy. To maintain a competitive edge, production managers must move beyond “set it and forget it” mentalities and master the nuances of UV intensity.
The Fundamental Distinction: Intensity vs. Energy Density
The most common mistake in UV process management is using the terms “intensity” and “dose” interchangeably. To manage a production line effectively, you must understand the difference between these two metrics.
What is UV Intensity (Irradiance)?
UV intensity, technically known as irradiance, is the “brightness” or power of the UV light reaching the surface at a specific moment. It is measured in Watts per square centimeter (W/cm²) or milliwatts per square centimeter (mW/cm²). Think of intensity as the speed of a car; it tells you how much power is being applied to the chemistry at any given instant.
High intensity is crucial for initiating the chemical reaction in UV-curable inks, adhesives, and coatings. It is particularly important for overcoming oxygen inhibition in thin coatings, ensuring that the surface of the material becomes tack-free and hard.
What is UV Energy Density (Dose)?
Energy density, or dose, is the total amount of UV energy delivered to the surface over a period of time. It is measured in Joules per square centimeter (J/cm²) or millijoules per square centimeter (mJ/cm²). If intensity is the speed of the car, the dose is the total distance traveled. Dose is calculated by multiplying intensity by the duration of exposure (dwell time).
A production manager must realize that while you can achieve the same “dose” by using a low-intensity light for a long time or a high-intensity light for a short time, the chemical results are often vastly different. Most modern high-speed lines require high intensity to trigger the polymerization process correctly.
Why UV Intensity Matters for Product Quality
Maintaining the correct UV intensity isn’t just about making sure the product is dry to the touch. It affects the physical and chemical properties of the finished good in several ways:
- Adhesion: If the intensity is too low, the UV light may not penetrate through the coating to the substrate. This results in a “top-cure” where the surface looks fine, but the bottom layer remains liquid, leading to delamination or peeling.
- Chemical Resistance: Proper cross-linking of polymers requires a specific threshold of intensity. Without it, the coating may be susceptible to solvents, cleaning agents, or environmental degradation.
- Hardness and Scratch Resistance: Under-cured coatings are softer and more prone to mechanical damage during shipping and handling.
- Color Stability: In the printing industry, insufficient UV intensity can lead to “bleeding” or shifts in color density as the ink fails to set instantly.
The Primary Drivers of UV Intensity Degradation
UV systems are not static. From the moment a UV lamp is turned on, its intensity begins to decline. Production managers must account for these four primary factors that sap the strength of their UV systems:
1. Lamp Aging
Traditional mercury vapor lamps have a finite lifespan, typically ranging from 1,000 to 2,000 hours. As the lamp ages, the electrodes erode and the quartz envelope begins to “solarize” or turn opaque. This prevents UV photons from escaping, significantly dropping the irradiance even if the lamp still appears bright to the human eye.
2. Reflector Contamination
In most UV systems, up to 75% of the UV energy reaching the product is reflected energy. The reflectors behind the bulb are just as important as the bulb itself. Dust, airborne oils, and outgassing from the curing chemistry can coat these reflectors. A dull or dirty reflector can reduce UV intensity by 50% or more, even if you have just installed a brand-new lamp.
3. Distance from the Substrate
UV intensity follows the inverse square law. As the distance between the UV source and the product increases, the intensity drops off exponentially. If a production manager changes the height of the lamp assembly to accommodate a thicker part but fails to adjust the power settings, the product will likely be under-cured.
4. Power Supply Fluctuations
Older ballast-driven systems can be sensitive to factory power fluctuations. If the voltage drops during peak factory hours, your UV intensity may dip below the required threshold for a successful cure, leading to intermittent quality issues that are notoriously difficult to troubleshoot.
How to Measure and Monitor UV Intensity
You cannot manage what you do not measure. For a production manager, relying on the “eyeball test” is a recipe for disaster. UV light is invisible to the human eye; what we see is merely the violet glow of visible light, which does not correlate to curing power.
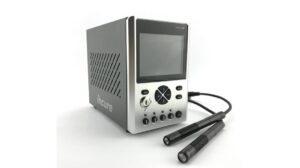
The Role of the Radiometer
A UV radiometer is the most essential tool in your quality control kit. These devices are passed through the UV oven or placed under the lamp to provide an accurate reading of both peak irradiance (mW/cm²) and total dose (mJ/cm²). There are several types of monitoring solutions:
- Portable Radiometers (Pucks): These are disc-shaped devices that run along the conveyor belt. They provide a “snapshot” of the system’s performance at that moment.
- Online Sensors: Some modern systems include integrated sensors that provide real-time intensity data to the PLC. This allows for immediate alerts if the intensity drops below a setpoint.
- UV Strips: These are color-changing labels. While less accurate than digital radiometers, they provide a quick visual confirmation that UV energy was present.
Establishing a Baseline
The first step for any production manager is to establish a “Process Window.” When the process is running perfectly, take a radiometer reading. This is your “Golden Standard.” All future measurements should be compared against this baseline. If your baseline is 1000 mW/cm² and your weekly check shows 800 mW/cm², you know it is time to clean reflectors or check lamp hours.
Optimizing Production Efficiency through Intensity Management
Understanding intensity allows a production manager to optimize the line for speed and cost, rather than just “cranking up the power.”
Balancing Line Speed and Power
If you need to increase production throughput, you must increase the line speed. However, increasing speed reduces the dwell time (dose). To compensate, you must increase the UV intensity. By knowing the exact intensity requirements of your chemistry, you can calculate the maximum possible line speed without risking under-cure.
Energy Savings
Many production facilities run their UV lamps at 100% power at all times “just to be safe.” This wastes an enormous amount of electricity and shortens lamp life. If your radiometer tells you that you are achieving double the required intensity for a successful cure, you can safely dial back the power, extending the life of your consumables and reducing your utility bill.
The Shift to UV LED: A New Paradigm for Intensity
Many production managers are currently transitioning from traditional mercury arc lamps to UV LED curing systems. This shift changes how intensity is managed.
UV LED systems offer “instant-on/off” capabilities and much higher peak irradiance compared to mercury lamps. However, their spectral output is very narrow (usually centered around 365nm, 385nm, or 395nm). While a mercury lamp provides a broad spectrum of UV-A, UV-B, and UV-C, an LED provides a massive “spike” of intensity at one wavelength.
From a management perspective, LEDs are much more stable. They do not have reflectors that degrade in the same way, and their output remains consistent for tens of thousands of hours. However, the requirement for precise measurement remains, as LED chips can still fail or become obscured by debris.
Common Troubleshooting Scenarios for Production Managers
When a product fails a “thumb twist” test or a cross-hatch adhesion test, the production manager should look at intensity-related causes first:
Scenario A: The product is tacky on the surface.
Likely Cause: Low peak intensity. Surface cure is often inhibited by oxygen. High intensity is required to “starve” the oxygen at the surface and allow the polymers to chain together. Check if the lamps are old or if the distance from the lamp to the product has increased.
Scenario B: The coating is brittle and cracks when bent.
Likely Cause: Over-curing. The intensity or the dose is too high, leading to excessive cross-linking. This makes the material lose its flexibility. Consider increasing line speed or lowering lamp power.
Scenario C: The ink wipes off easily but feels dry.
Likely Cause: Poor penetration. The intensity might be high enough for the surface, but the wavelength or the total energy isn’t reaching the substrate. This is common with highly pigmented inks like black or opaque white. You may need a different lamp type (like a Gallium-doped bulb) or a slower line speed to increase the dose.
Maintenance Protocols for Consistent Intensity
To ensure that UV intensity remains within the required process window, production managers should implement a formal maintenance schedule:
- Daily: Visual inspection of the cooling system. UV lamps generate immense heat; if the cooling fans or water chillers fail, the lamp’s spectral output will shift and intensity will drop.
- Weekly: Clean the reflectors and the lamp sleeves with high-purity isopropyl alcohol and lint-free wipes. Even a fingerprint can bake onto the quartz and block UV light.
- Bi-Weekly/Monthly: Take radiometer readings at standardized points across the width of the conveyor to ensure “uniformity.” If the center is at 1000 mW/cm² but the edges are at 600 mW/cm², your products on the edge of the belt will fail.
- Every 1,000 Hours: Evaluate lamp performance. Don’t wait for the lamp to burn out. If the intensity has dropped by 20-30% from the baseline, replace it proactively to avoid unplanned downtime.
Safety Considerations for High-Intensity UV Systems
High UV intensity is dangerous to human operators. Managing intensity also means managing the risks associated with it:
- Light Leaks: Ensure that all shielding is intact. UV-C and UV-B radiation can cause “welder’s flash” (photokeratitis) in seconds.
- Ozone Management: Standard mercury lamps produce ozone, a respiratory irritant. Ensure that exhaust systems are pulling enough air to keep ozone levels below OSHA limits.
- PPE: Ensure all maintenance personnel have UV-rated face shields, long sleeves, and gloves when performing tests on live lamps.
Conclusion: The Strategic Advantage of Mastering UV Intensity
For a production manager, UV intensity is a critical variable that links chemical science to mechanical throughput. By investing in the right measurement tools, establishing rigorous baselines, and maintaining a proactive maintenance schedule, you can eliminate the guesswork that plagues many UV curing operations.
Mastering UV intensity results in higher yields, lower energy costs, and the peace of mind that every product leaving your line meets the highest quality standards. In an era where manufacturing margins are tighter than ever, the ability to control this invisible force is a significant competitive advantage.
Visit www.blazeasia.com for more information.