The Little-Known Tool That Prevents UV Curing Failures
In the world of modern manufacturing, efficiency and speed are the dual engines of success. Ultraviolet (UV) curing technology has revolutionized industries ranging from automotive assembly and electronics to packaging and medical device manufacturing. By using high-intensity UV light to instantly “cure” or harden inks, coatings, and adhesives, companies have slashed production times and reduced their environmental footprint. However, there is a silent predator lurking in many UV production lines: process drift. This invisible shift in performance leads to catastrophic curing failures, resulting in scrapped batches, product recalls, and damaged reputations.
While most engineers focus on the chemistry of the resins or the mechanical speed of the conveyor, they often overlook the most critical component of the entire system. There is a little-known tool—at least, little-known to those outside the circle of high-precision manufacturing—that acts as the ultimate insurance policy against these failures. That tool is the UV Radiometer. In this comprehensive guide, we will explore why UV curing fails, how the UV radiometer solves these issues, and why it is the most important investment you can make for your production line.
Why UV Curing Failures are a Manufacturer’s Nightmare
UV curing is often treated as a “set it and forget it” process. Once the lamps are installed and the conveyor speed is calibrated, many operators assume the system will perform consistently indefinitely. Unfortunately, UV light is invisible to the human eye, and its behavior changes over time due to factors that are impossible to detect without specialized equipment.
When UV curing fails, the consequences are rarely subtle. You might encounter:
- Tacky Surfaces: The top layer of the coating remains sticky, attracting dust and debris.
- Poor Adhesion: The cured material peels away from the substrate because the UV light didn’t penetrate deep enough to bond.
- Delamination: Multi-layer coatings separate, compromising the structural integrity of the product.
- Incomplete Polymerization: Residual monomers remain in the coating, which can lead to “outgassing” or toxicity issues, especially critical in medical and food packaging.
The cost of these failures extends far beyond the immediate loss of materials. It includes the labor costs of rework, the energy wasted on failed runs, and the potential for massive liability if a failed component reaches a customer in the field. This is why understanding the “invisible variables” of UV light is paramount.
The Invisible Variables: Why You Can’t Trust Your Eyes
One of the biggest myths in industrial manufacturing is that if a UV lamp is glowing blue, it is working correctly. This couldn’t be further from the truth. The blue or violet light you see is merely a byproduct of the visible spectrum; the actual ultraviolet energy required for curing is completely invisible.
1. Lamp Degradation
Whether you are using traditional mercury vapor lamps or modern UV LED systems, all UV sources degrade over time. Mercury lamps, in particular, have a finite lifespan. As they age, their output in the specific UV-A, UV-B, or UV-C wavelengths drops significantly, even if the lamp still appears bright to the operator. Without a tool to measure this drop, you are essentially guessing at your curing efficiency.
2. Reflector Fouling
In traditional arc lamp systems, reflectors are used to focus the UV energy onto the product. Over time, these reflectors become coated with dust, evaporated monomers, or cooling-air contaminants. A dull or dirty reflector can reduce the UV intensity reaching your product by as much as 50%, even if the lamp itself is brand new.
3. Power Supply Fluctuations
Inconsistent voltage or aging power supplies can cause the UV output to fluctuate. These “brownouts” in UV intensity might last for only a few seconds, but if a product passes under the lamp during that window, it will be under-cured, creating a localized failure that is difficult to spot during a final inspection.
Introducing the UV Radiometer: The Secret to Process Control
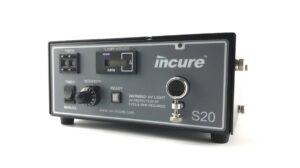
The UV radiometer is a specialized instrument designed to measure the actual UV energy delivered to a surface. Unlike a standard light meter, a radiometer is calibrated to respond only to specific UV bandwidths. It is the only way to “see” exactly what your coating or adhesive is experiencing as it passes through the curing tunnel.
By placing a radiometer on the conveyor belt and sending it through the UV system, you gain access to data that was previously invisible. This tool transforms UV curing from a “black box” process into a measurable, repeatable scientific procedure.
How a UV Radiometer Eliminates Guesswork
To understand how this tool prevents failure, we must look at the two primary metrics it measures: Irradiance and Energy Density.
Measuring Irradiance (Intensity)
Irradiance is the “brightness” or power of the UV light at a specific moment. It is measured in mW/cm2 (milliwatts per square centimeter). Think of irradiance as the “pressure” of the light. High irradiance is necessary to trigger the photoinitiators in the chemistry and to penetrate through thick or highly pigmented coatings. If your irradiance is too low, the UV light will never reach the bottom of the coating, leading to adhesion failure.
Measuring Energy Density (Dosage)
Energy Density, or dosage, is the total amount of UV energy delivered over a period of time. It is measured in mJ/cm2 (millijoules per square centimeter). This is a function of both the intensity of the light and the duration of exposure (conveyor speed). If your dosage is too low, the material won’t fully polymerize. If it is too high, you risk over-curing, which can make materials brittle or cause discoloration.
A UV radiometer provides both of these numbers, allowing you to establish a “Process Window.” If your measurements fall outside this window, you know immediately that a failure is imminent, allowing you to stop the line and fix the issue before a single defective product is made.
The Real-World Impact of UV Monitoring
Let’s look at how the implementation of a UV radiometer changes the manufacturing environment. Imagine a high-speed printing facility. They are running a job that requires a specific UV-curable varnish. Halfway through the shift, the cooling fan on one of the UV lamp housings fails slightly, causing the lamp to overheat. As the lamp overheats, its UV output drops by 30%.
Scenario A (No Radiometer): The operator doesn’t notice any change because the lamp is still glowing. The line continues for four hours. During the quality check the next morning, the team discovers that the varnish on 20,000 units is tacky and easily scratches off. The entire batch is scrapped, costing the company thousands of dollars and a missed deadline.
Scenario B (With Radiometer): The facility has a protocol to run a UV radiometer through the system every two hours. At the two-hour mark, the operator runs the tool and sees that the mW/cm2 has dropped well below the required threshold. They immediately stop the line, identify the cooling issue, fix it, and resume production. Only a small amount of material is affected, and the deadline is met.
Types of UV Measurement Tools
Not all UV radiometers are created equal. Depending on your specific application, you may need different types of tools:
1. Standard “Puck” Radiometers
These are the industry standard. They are self-contained, disc-shaped units that you place on the conveyor. As they pass under the lamps, they record the peak irradiance and total energy density. They are rugged, easy to use, and perfect for daily quality control checks.
2. Profiling Radiometers
Profiling radiometers do more than just give you the final numbers; they provide a graph of the UV intensity over time. This allows you to see the performance of each individual lamp in a multi-lamp system. If Lamp 3 is weaker than Lamp 1 and 2, the profile will show a dip in the graph, telling you exactly which bulb needs to be replaced.
3. Spot Radiometers
For manual UV curing applications, such as medical device bonding where a technician uses a UV wand, a spot radiometer is used. The wand is placed into a localized sensor to ensure the light guide is delivering the correct intensity to the bond site.
Integrating UV Radiometry into Your Workflow
To truly prevent failures, the radiometer shouldn’t just sit in a drawer for emergencies. It must be integrated into your Standard Operating Procedures (SOPs). Here is how the most successful manufacturers use this tool:
- Baseline Mapping: When a new process is validated, use the radiometer to record the “perfect” UV levels. This becomes your gold standard.
- Daily Verification: Run the radiometer through the line at the start of every shift. This ensures that environmental factors haven’t shifted the process overnight.
- Maintenance Triggers: Instead of replacing lamps based on “hours used” (which is often inaccurate), replace them when the radiometer shows a 20% drop in intensity. This saves money by extending the life of good lamps and prevents failures from bad ones.
- Supplier Accountability: Use the radiometer to verify that new lamps or new batches of UV resins meet the specifications provided by your vendors.
Common Myths About UV Curing and Measurement
Despite the clear benefits of measurement, several myths persist in the industry that lead to avoidable failures.
Myth: “My UV system has a built-in sensor, so I don’t need a radiometer.”
Many modern UV systems have internal monitors. However, these sensors are often located near the lamp, not at the product level. They don’t account for dirty reflectors or the distance between the lamp and the substrate. An external radiometer measures what the product actually “sees,” which is the only measurement that matters for quality control.
Myth: “UV LED systems don’t need to be measured because they don’t degrade.”
While UV LEDs last much longer than mercury lamps, they still degrade. Furthermore, LEDs are highly sensitive to heat. If the cooling system for an LED array fails, the UV output can drop instantly and significantly. Measurement is just as vital for LED systems as it is for traditional ones.
Myth: “Radiometers are too expensive.”
The cost of a high-quality UV radiometer is typically less than the cost of a single large-scale production failure. When you factor in the savings from optimized lamp replacement and reduced scrap, the tool usually pays for itself within the first few months of use.
The Future of UV Curing: Data-Driven Manufacturing
As we move toward “Industry 4.0,” the demand for data is increasing. Customers now want proof that their products were manufactured within specific tolerances. A UV radiometer provides the data logs necessary for this level of traceability. In industries like aerospace or medical manufacturing, having a recorded log of the UV dosage for every production run is becoming a standard requirement.
By using this “little-known tool,” you aren’t just preventing failures; you are professionalizing your entire operation. You are moving from a culture of “guessing and hoping” to a culture of “knowing and controlling.”
Conclusion: Protecting Your Bottom Line
UV curing failures are expensive, frustrating, and entirely preventable. The “invisible” nature of ultraviolet light makes it a dangerous variable in any production line, but the UV radiometer provides the sight needed to manage it. By measuring irradiance and energy density, manufacturers can detect lamp degradation, reflector issues, and process drift before they result in defective products.
If you are using UV technology in your facility, ask yourself: Do you actually know how much light is hitting your product right now? If the answer is “no,” you are running a risk that your business doesn’t need to take. Invest in a professional-grade UV radiometer, establish a rigorous measurement protocol, and turn your UV curing process into a pillar of reliability and quality.
The difference between a successful manufacturer and one struggling with quality issues often comes down to the tools they use to measure success. Don’t let your UV process remain a mystery. Use the tool that the experts use, and ensure that every product that leaves your line is perfectly cured, every single time.
Visit www.blazeasia.com for more information.